
.JPG)


Our hostesses this month, Evelyne of Cheap Ethnic Eatz, and Valerie of a The Chocolate Bunny, chose delicious pate with freshly baked bread as their June Daring Cook’s challenge! They’ve provided us with 4 different pate recipes to choose from and are allowing us to go wild with our homemade bread choice.
This months challenge was so much Fun that I can thank Evelyne and Valerie enough. I made 3 different Version and would have made some more if there had been time. But since this was so easy I already know what will be under the Christmas tree for the family. And I just love the idea to bring a Pate in a Jar as a small present to the next dinner we are invited to?

My first Version was a Turkey Liver Terrine using the Chicken Liver Terrine recipe but using Turkey instead of the Chicken.
It was amazing and even the hubby loved it, the kids not so much, but that was nothing new.
For my second Version I again used the Chicken Liver Recipe but made it a Chicken liver Terrine with Rosemary and Bacon. Oh this was so good, you will not believe me how good it was. This I will make again and again.

The Third Version was a Chicken Liver Terrine that was imbedded in a Cider Jelly together with small cubes of fresh Apples. The Picture is horrible, it was already dark and this was the only portion left so it was the smallest on and the ugliest. The Guest loved it and it was easy.
So this months Challenge was perfect, it was fun it was easy, it let us be creative and the best part is you can freeze the leftovers. Love it.
And since the Bread baking was Part of this Months Challenge I made a Baguette, a German Black Forrest Peasant Bread and a plain Milk Loaf.
Go now take a look at what the other Daring Cook`s did over at the Daring Kitchen Homepage and be a little daring and give it a try.
Chicken Liver Terrine Yields one 25 by 12,5 cm (10 by 5 inch) terrine or loaf pan
1 tbsp duck fat, or butter 2 onions, coarsely chopped 300g (11 oz) chicken livers, trimmed 3 tbsp brandy, or any other liqueur (optional) 100g (3 1/2 oz, 1/2 cup) smoked bacon, diced 300g (11 oz) boneless pork belly, coarsely ground
200g (7 oz) boneless pork blade (shoulder), coarsely ground (or ground pork see note below) 2 shallots, chopped 1 tsp quatre-épices (or ¼ tsp each of ground pepper, cloves, nutmeg and ginger is close enough) 2 eggs 200 ml (7 fl oz, 3/4 cup + 2 tbsp) heavy cream 2 fresh thyme sprigs, chopped Salt and pepper
NOTE: If you cannot find ground pork belly or blade, buy it whole, cut it into chunks, and pulse in the food processor. You can also replace the pork blade with regular ground pork.
Preheat oven to 200ºC (400ºF, Gas Mark 6).
Melt the fat or butter in a heavy frying pan over low heat. Add the onions and cook, stirring occasionally, for 5 minutes, until softened. Add the chicken livers and cook, stirring frequently, for about 5 minutes, until browned but still slightly pink on the inside.
Remove the pan from heat. Pour in the brandy, light a match and carefully ignite the alcohol to flambé. Wait for the flames to go out on their own, carefully tilting the pan to ensure even flavoring. Set aside.
Put the minced pork belly and blade in a food processor, then add the onion-liver mixture and the
chopped shallots, and pulse until you obtain a homogenous mixture – make sure not to reduce it to a slurry.
Transfer to a bowl, and gradually stir in the chopped bacon, quatre-épices, cream, eggs, and thyme. Season with salt and pepper, and mix well. Spoon the mixture into a terrine or loaf pan, and cover with the terrine lid or with aluminum foil.
Prepare a water bath: place the loaf pan in a larger, deep ovenproof dish (such as a brownie pan or a baking dish). Bring some water to a simmer and carefully pour it in the larger dish. The water should reach approximately halfway up the loaf pan.
Put the water bath and the loaf pan in the oven, and bake for 2 hours. Uncover and bake for another 30 minutes. The terrine should be cooked through, and you should be able to slice into it with a knife and leave a mark, but it shouldn’t be too dry. Refrigerate, as this pâté needs to be served cold.
Unmold onto a serving platter, cut into slices, and serve with bread.
NOTE: This pâté freezes well. Divide it into manageable portions, wrap tightly in plastic film, put in a freezer Ziploc bag, and freeze. Defrost overnight in the fridge before eating.

The reason I have not posted anything new is my garden.
I love my garden. And now that finally the summer has started I am not willing to miss a thing.
This year I grow a lot of things and I just love to watch how it grows. We have not only vegetables and salads, we also have apples, plums, cherries, sour cherries and grapes.

And if I am not watching me vegetables and fruits grow I play in the sandbox with my boys.
Or we play with our tents ( wigwams made by the boys aunt). Or we are 50 meters away in the open-air pools. Or we eat fresh strawberries warm from the sun.
Yes life is good and delicious.

If only it would be near the house, or near a functioning Toilet.

Look at this little jewels. I love the colors and believe me they taste divine.
And since I hate to throw good food away I love to make a Radish Soup using the greens.
If you never had a Radish Soup you should really give it a try.
Radish Soup
2 bunches radishes, washed
1 small onion, minced
1 tbsp. butter
3/4 c. yogurt, plain
1 1/2 c. chicken stock
Separate the radishes from the greens, reserving both.
Cook the onion in the butter until translucent, then add the radish greens. Cook over low heat, stirring occasionally, until wilted. Puree in a blender or food processor along with half the yogurt and half the chicken stock. Return to the heat and add the other half of the yogurt and half the chicken stock until heated through and through. Season with Salt and Pepper to taste.
Cut some of the reserved radishes into a julienne sprinkle over the top of the soup for decoration and crunch.

The May 2010 Daring Bakers’ challenge was hosted by Cat of Little Miss Cupcake. Cat challenged everyone to make a piece montée, or croquembouche, based on recipes from Peter Kump’s Baking School in Manhattan and Nick Malgieri.
This months challenge I used to make my life a little easier. Last week the twins turned 4 and I needed something for preschool. Normally a tray of Muffins would have been good enough. But having to do this challenge, knowing that the kids would love to get some of this creamy sticky mess I just had to do it for them. I filled them with Banana flavored Cream ( this was the request of one minute younger).
So I baked the Puffs Sunday night and filled and decorated them with the boys right before we had to go. I had them cut out little Birds, using the Marshmallow Fondant while I was having a sugar crisis.
I have to confess I hate to make caramel. I always burn myself, I always burn the first batch, I always want to eat it.
But believe me it was worth it. The kids did go crazy loving the Birds ( the group my boys are in is called the Blackbirds). Only seconds after setting them down the plate was empty and I got adoring looks from 28 Kids.
My Boys called me supermom on the way home and yes in that moment I felt like one.
Go take a look at the delicious things the others did. And if you want to try it yourself get a printable version of the Recipe Here!
Pour cream into a stainless steel/ceramic bowl. Press plastic wrap firmly against the surface. Chill immediately and until ready to use.
For Chocolate Pastry Cream (Half Batch Recipe):
Bring ¼ cup (about 50 cl.) milk to a boil in a small pan; remove from heat and add in 3 ounces (about 80 g.) semisweet chocolate, finely chopped, and mix until smooth. Whisk into pastry cream when you add the butter and vanilla.
For Coffee Pastry Cream (Half Batch recipe)
Dissolve 1 ½ teaspoons instant espresso powder in 1 ½ teaspoons boiling water. Whisk into pastry cream with butter and vanilla.
Pate a Choux (Yield: About 28)
¾ cup (175 ml.) water
6 Tbsp. (85 g.) unsalted butter
¼ Tsp. salt
1 Tbsp. sugar
1 cup (125 g.) all-purpose flour
4 large eggs
For Egg Wash: 1 egg and pinch of salt
Pre-heat oven to 425◦F/220◦C degrees. Line two baking sheets with parchment paper.
Preparing batter:
Combine water, butter, salt and sugar in a saucepan over medium heat. Bring to a boil and stir occasionally. At boil, remove from heat and sift in the flour, stirring to combine completely.
Return to heat and cook, stirring constantly until the batter dries slightly and begins to pull away from the sides of the pan.
Transfer to a bowl and stir with a wooden spoon 1 minute to cool slightly.
Add 1 egg. The batter will appear loose and shiny.
As you stir, the batter will become dry-looking like lightly buttered mashed potatoes.
It is at this point that you will add in the next egg. Repeat until you have incorporated all the eggs.
Piping:
Transfer batter to a pastry bag fitted with a large open tip (I piped directly from the bag opening without a tip). Pipe choux about 1 inch-part in the baking sheets. Choux should be about 1 inch high about 1 inch wide.
Using a clean finger dipped in hot water, gently press down on any tips that have formed on the top of choux when piping. You want them to retain their ball shape, but be smoothly curved on top.
Brush tops with egg wash (1 egg lightly beaten with pinch of salt).
Baking:
Bake the choux at 425◦F/220◦C degrees until well-puffed and turning lightly golden in color, about 10 minutes.
Lower the temperature to 350◦F/180◦C degrees and continue baking until well-colored and dry, about 20 minutes more. Remove to a rack and cool.
Can be stored in a airtight box overnight.
Filling:
When you are ready to assemble your piece montée, using a plain pastry tip, pierce the bottom of each choux. Fill the choux with pastry cream using either the same tip or a star tip, and place on a paper-lined sheet. Choux can be refrigerated briefly at this point while you make your glaze.
Use one of these to top your choux and assemble your piece montée.
Chocolate Glaze:
8 ounces/200 g. finely chopped chocolate (use the finest quality you can afford as the taste will be quite pronounced; I recommend semi-sweet)
Melt chocolate in microwave or double boiler. Stir at regular intervals to avoid burning. Use the best quality chocolate you can afford. Use immediately.
Hard Caramel Glaze:
1 cup (225 g.) sugar
½ teaspoon lemon juice
Combine sugar and lemon juice in a saucepan with a metal kitchen spoon stirring until the sugar resembles wet sand. Place on medium heat; heat without stirring until sugar starts to melt around the sides of the pan and the center begins to smoke. Begin to stir sugar. Continue heating, stirring occasionally until the sugar is a clear, amber color. Remove from heat immediately; place bottom of pan in ice water to stop the cooking. Use immediately.
Assembly of your Piece Montée:
You may want to lay out your unfilled, unglazed choux in a practice design to get a feel for how to assemble the final dessert. For example, if making a conical shape, trace a circle (no bigger than 8 inches) on a piece of parchment to use as a pattern. Then take some of the larger choux and assemble them in the circle for the bottom layer. Practice seeing which pieces fit together best.
Once you are ready to assemble your piece montée, dip the top of each choux in your glaze (careful it may be still hot!), and start assembling on your cake board/plate/sheet. Continue dipping and adding choux in levels using the glaze to hold them together as you build up. (You may want to use toothpicks to hold them in place – see video #4 below).
When you have finished the design of your piece montée, you may drizzle with remaining glaze or use ribbons, sugar cookie cut-outs, almonds, flowers, etc. to decorate. Have fun and enjoy! Bon appétit!
Additional Information: Here are some videos you may want to take a look at before you get started on your piece montée.
1) Martha Stewart Assembles a Croquembouche here.
2) Assembling croquembouche using the interior of a cylinder here.
3) Asembling Free-standing Croquembouche with Chocolate Glaze here.
4) Assembling a Croquembouche with Toothpicks and Cone here.
Here’s a link to a dairy-free pate a choux and crème patisserie recipe here.


Finally I was able to take a picture of our Muffin Tin ( yes I know it is not a Tin) Snack.
So I just have to post about it and take Part in the Muffin Tin Monday.
I love to see what all the others do and maybe you would also have fun.
Just go to Muffin Tin Mom and be amazed.
For our first time we did something simple, we had whole grain toast Duck with cream cheese, Bird sausage in a nest made out of carrot salad and some peanuts as bird feed.
The twins loved it.
First of all Happy Birthday to my little Boys.
Four Years ago I became a Mother and even if it took 3 more days for me to see them for the first time I loved them long before I had the pleasure to get to know them.
This two Gentlemen make my life Heaven and Hell and I would do anything for them.
Even baking 2 Cakes with 8 layers of Vanilla Cake, German Butter Cream and Homemade Raspberry Jam.
I covered them with Marshmallow Fondant, I found a wonderful Recipe at Bake at 350.
One minute older wanted a Train ( no surprise he is obsessed) one minute younger wanted a Tractor.
So having nothing better to do I made them, I made them big, I made them red.

How do you like them? I think the Train looks cute, but the Tractor looks more like a Racing Car.

Marshmallow Fondant

16 oz. bag mini marshmallows
3 TBSP water
2 lbs. powdered sugar
Crisco
I use a mix of cornstarch and powdered sugar for rolling
Grease a large glass bowl with Crisco.
Pour in the marshmallows and water in the bowl. Microwave at 30-second intervals, stirring after each interval, until melted.
Reserve about 1/4 c. powdered sugar. Place the rest of the powdered sugar in the large bowl of a standing mixer. Grease the paddle attachment with Crisco. Pour the melted marshmallows onto the powdered sugar.
Beat until a dough forms. There will be lots of loose bits and sugar in the bottom of the bowl.
Grease a clean work surface with Crisco and dump out the fondant and all loose bits. Grease hands liberally with Crisco and knead the mixture together, just like kneading bread, for about 5 minutes until smooth.
Grease hands again as needed. As the fondant becomes smoother, use the reserved powdered sugar to coat the surface to keep it from sticking.
Once smooth, you can divide and color the fondant. While working with one piece, cover the remaining fondant with plastic wrap to keep it from drying out.
When you have your colors finished, or just keep it all white, coat the fondant in a light layer of Crisco. Wrap in plastic wrap and place in a large bag. Let rest overnight. Store at room temperature for several months.
To use it, dust the surface and rolling pin with cornstarch/powdered Sugar Mix and roll to 1/8th of an inch and decorate away.

Our hosts this month, Barbara of Barbara Bakes and Bunnee of Anna+Food have chosen a delicious Stacked Green Chile & Grilled Chicken Enchilada recipe in celebration of Cinco de Mayo! The recipe, featuring a homemade enchilada sauce was found on www.finecooking.com and written by Robb Walsh.

I have not been able to cook the original challenge. It was impossible to get most of the Ingredients and the ones I would have been able to get would have cost a fortune.

As it came to the sauce I used the Quick Chicken Mole receipt that has been given to us.
It tasted good, not good enough for my 3 men but good enough for me.
I will make sure to give the original version a try if my Tomatillo plants do grow in our German weather.
Go and take a look at the lovely things the other Daring Cooks did and maybe you give it a try yourself.
Ingredients
1½ pounds Fresh Anaheim chiles (about eight 6 to 8 inch chiles) 24 ounces 678 grams - roast, peel, remove seeds, chop coarsely. Other green chiles (NOT bell peppers) could probably be substituted but be conscious of heat and size!)
7-8 ounces Tomatillos (about 4-5 medium)212 grams - peel, remove stems
4 cups Chicken broth (32 ounces/920 grams)
1 clove Garlic, minced
2 teaspoons yellow onion, minced
1 teaspoon dried oregano
½ tsp Kosher salt (add more to taste)
¼ tsp Black Pepper (add more to taste)
2 tablespoons Cornstarch (dissolve in 2 tablespoons water, for thickening)
Hot sauce, your favorite, optional
2 Boneless chicken breasts (you can also use bone-in chicken breasts or thighs)
3 tablespoons Olive oil or other neutral vegetable oil (use more as needed)
Kosher salt and pepper
12 Small Corn tortillas (5-6 inch/13-15 cm). (you can also use wheat tortillas or other wraps)
6 ounces grated Monterey Jack, 170 grams (other cheeses (cheddar, pepper jack, Mexican cheeses) can be used. Just be sure they melt well and complement the filling)
Cilantro for garnish, chopped and sprinkled optional
Directions:
Roasting Fresh Chiles
1. Coat each chile with a little vegetable oil. If you are doing only a couple chiles, using the gas stove works. For larger batches (as in this recipe), grilling or broiling is faster.
2. Lay the oiled chiles on the grill or baking sheet (line pan with foil for simpler clean-up). Place the grill or broil close to the element, turning the chiles so they char evenly. They should be black and blistered.
3. As they are completely charred (they will probably not all be done at once), remove them to a bowl and cover with plastic, or close up in a paper bag. Let them rest until they are cool.
4. Pull on the stem and the seed core MAY pop out (it rarely does for me). Open the chile and remove the seeds. Turn the chile skin side up and with a paring knife, scrape away the skin. Sometimes it just pulls right off, sometimes you really have to scrape it.
5. DO NOT RINSE!
Green Chile Sauce
1. Put a medium saucepan of water on to boil and remove the papery outer skin from the tomatillos. Boil the tomatillos until soft, 5 to 10 minutes. You can also grill the tomatillos until soft.
2. Drain and puree in a blender or food processor.
3. Return the tomatillos to the saucepan along with the chicken broth, chopped green chiles, minced onion, oregano, garlic, salt and pepper.
4. Bring to a boil over medium-high heat and then reduce the heat and simmer for 10 minutes.
5. Add the cornstarch/water mixture and stir well. Simmer, stirring occasionally, until the sauce is thickened and reduced to 4-5 cups, another 10-15 minutes.
6. Adjust seasonings and add hot sauce if you want a little more heat.
Stacked Green Chile and Grilled Chicken Enchiladas
1. Heat a gas grill to medium high or build a medium-hot charcoal Coat the chicken with olive oil and season well with salt and pepper. Preheat oven to 450 degrees.
2. Grill the chicken until just cooked through, 4-5 minutes a side for boneless chicken breasts.
3. Cool and then slice into thin strips or shred.
4. In a small skillet, heat 3 tablespoons oil over medium-high heat until very hot. Dip the edge of a tortilla into the oil to check – it should sizzle immediately.
5. Using tongs, put a tortilla into the pan and cook until soft and lightly brown on each side, about 15-20 seconds per side (at the most).
6. Drain on paper towels.
7. Add oil as needed and continue until all 12 tortillas are done.
8. In a baking dish large enough to hold four separate stacks of tortillas, ladle a thin layer of sauce.
9. Lay four tortillas in the dish and ladle another ½ cup (4 ounces/112 grams) of sauce over the tortillas.
10. Divide half the chicken among the first layer of tortillas, top with another ½ cup of sauce and 1/3 of the grated cheese.
11. Stack another four tortillas, top with the rest of the chicken, more sauce and another third of the cheese.
12. Finish with the third tortilla, topped with the remaining sauce and cheese.
13. Bake until the sauce has thickened and the cheese melted, about 20 minutes. Let rest for 5-10 minutes.
14. To serve, transfer each stack to a plate. Spoon any leftover sauce over the stacks and sprinkle with cilantro, if you wish. The stacks may also be cooked in individual gratin dishes.
Additional Information:
Roasting chiles: Whether you roast the chiles on a grill, under the broiler, or use the gas burner element on your stove will affect the time it takes. If you do all the chiles at once on a grill or using the broiler, it will take 15- 30 minutes, plus time to steam (10 minutes) and time to peel and remove seeds (20 minutes).
http://www.ehow.com/how_5106125_roast-anaheim-peppers.html
http://www.ehow.com/how_4437304_roast-anaheim-green-chiles-grill.html
Cooking tomatillos: If you boil the tomatillos, it will take 5 -10 minutes. If you grill them, it will take 2-5 minutes. If you broil them, it will take 8-12 minutes. This can be done the same time the chiles are roasting. After they are cooked, they need to be pureed, which takes a few seconds in a blender.
http://culinarycory.com/2009/08/08/roasted-tomatillo-salsa/
http://jerseygirlcooks.blogspot.com/2009/02/roasted-tomatillo-salsa.html
Cooking chicken: If you grill your chicken, it takes about 5 or 6 minutes per side for boneless chicken breasts- depending on thickness of breasts. Other pieces (thighs, for example) or bone-in chicken will take longer. If you roast your chicken, a bone-in breast takes about 30 minutes (depending on size). Be sure chicken is done but not overcooked, since it will be in the oven in the last stage of the recipe. http://kalynskitchen.blogspot.com/2007/05/how-to-make-juicy-grilled-chicken.html
Corn Tortillas (from Rick Bayless’s Mexican Kitchen)
Makes about 15
1 3/4 cups masa harina
1 cup plus 2 tablespoons hot water
Pour hot water over masa harina, cover and let sit 30 minutes. Add (additional) cool water 1 tablespoon at a time until the dough is soft but not sticky. Divide the dough into 15 balls and cover with plastic wrap.
Heat a large (two burner) ungreased griddle or two large skillets, one on medium-low and one on medium-high.
Put a ball of dough between two sheets of plastic. If you don’t have a tortilla press, press to a 5-6” circle using a heavy frying pan or bread board or other heavy, flat object. Put the tortilla into the cooler pan or cooler end of the griddle. The tortilla will probably stick, but within 15 seconds, if the temperature is correct, it will release. Flip it at that point onto the hotter skillet/griddle section. In 30-45 seconds, it should be dotted with brown underneath. Flip it over, still on the hot surface and brown another 30 seconds or so. A good tortilla will balloon up at this point. Remove from heat and let them rest while cooking the remaining tortillas.

Do you like Rhubarb?
I do.
But only in Cake form and only if the Rhubarb is so soft that its melting on you tongue.
There is nothing as horrible as undercooked Rhubarb that gives you the felling of fur on your tongue.
This is a German cake, economical and delicious. That`s the way I like it.
But the best Part about this cake is that you can make it a strawberry cake, gooseberry cake or a blackberry cake by just replacing the key ingredient.
Try it and love it.

3 Eggs
270g Flour
1t Backing powder
170g Butter
170g Sugar
700g Rhubarb
40g Cornstarch
fresh whipped cream for serving
After separate the eggs. Knead the Egg yolks, Flour, Backing Powder, Butter and half of the Sugar into a dough. Cover with saran wrap and refrigerate for 30 minutes.
Preheat the oven 180°C.
Now clean and the Rhubarb, cutting it lengthways to then cut it into small dice.
Use parchment paper for the bottom of a spring form pan. Roll out the dough and put it into the pan. Make sure that you have a high rim. With a Fork prick the dough all over.
Beat the Egg whites until you have stiff peaks, add the left Sugar slowly. Mix the Rhubarb with the starch, add the Rhubarb into the Egg whites and finally spread it over the dough.
Bake for 1 hour. Carefully while the cake is still warm remove from the pan. Place on a cooling rack and let cool completely.
Serve with fresh cream.

Growing up in Baden-Württemberg the first real schwabian food most kids have is a fresh Bretzel. Most of the children on the streets sitting in the strollers have one in the hand. Car seats all over are cleaned on Saturdays from the crumbs of this delicious treat.
Don`t think that a schwabian Brezel is like a Bavarian one. We have a part that is bigger and with a cut making it possible to have a soft roll like part and a crispy part on the same Brezel.
Our Brezels are eaten in the morning or as a treat with a cup of coffee in the evening.
It`s hard for me to talk about it but at this point in time its hard to get a good Brezel. Most of the Bakers have closed or use horrible frozen Brezeln.
They are tasteless, either bone-dry or rubbery.
So no wonder I started to bake my own.
I was inspired by this Recipe from Hefe und Mehr. But I made some changes, because that`s just what I do.

Brezeln
yield 20 Pretzels or Rolls
Sponge
100g water
100g bread flour
1g fresh yeast
Dough
500g bread flour
400g spelt flour
225g water
300g milk (I use Goat since my boys are allergic to cow)
18g fresh yeast
20g salt
25g butter
all Sponge
Lye
1 liter water
40g NaOH pellets
coarse Salt for sprinkling
Mix water, flour and yeast for the Sponge and ferment it overnight (12 to 16 hours).
The next day: Mix all ingredients for the dough and knead it for about 3 min at low speed, then 6 min on high speed.
Ferment the dough for 30 minutes.
Divide the dough into pieces of 80g and form them into balls.
Rest them for 30 more minutes.

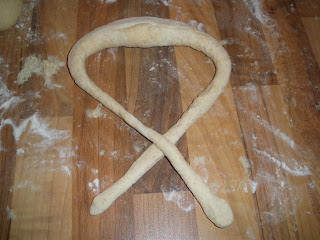


Now roll the dough to a strand of 65 cm. The strand should be thick in the middle and really thin at the ends. Form to a pretzel and place on a well floured tray. Proof one hour at room temperature, then place the tray for 5 minutes into the freezer ( or 30 min in the fridge). This makes the dough firmer, so it easier to place the pretzel in the lye.
In the meantime prepare the lye and heat the oven to 225°C.
Dip the pretzels for 10 seconds in the lye, then take them out with a slotted spoon.
Place on a tray lined with baking parchment. Slash the thick part of the pretzel, sprinkle with coarse salt and bake it at 225°C for 15-18 Minutes.
Place on a cooling rack and Enjoy.


I loved, loved, and loved this challenge. Since I used to make my own lard, making my own Suet was no big problem. I had a harder time getting it.
Still after having to wait 2 weeks for my Butcher to have what I so much needed it was super easy to have the first part of my suet puddings finished.
Knowing that it would hold better up to the transport I made a baked Jam Roly Poly. At first I wanted to make a steamed one but knowing my children and the love they have for crust I just knew that this was the way to go.The Roly Poly was filled with the last strawberry jam from last year and sprinkled with brown sugar. Served with a little fresh whipped cream it was a nice dessert.
Next time I will steam the Roly Poly because I think that this will help the flavours, not the forget that the baked one was on the dry side.

Next I made the Marmalade Pudding, again using the homemade jam. This was so delicious I not even wanted to share. Using my Grandmothers pudding form and the potato steamer for this task made it so easy and uncomplicated that I from now on will do it a lot.

There is much to explore, to taste and try. Go over to the Daring Bakers and take a look.
Or just grab the recipes here.

Since we are all still not feeling to well, I was just not in the mood to post. I did make great pictures of adorable and delicious food and will soon tell you about it.
But today I only have a small treat fro you.
I adore Alton and most of the time I am pretty happy with his food but this Grapefruit Brûlée with the sprinkling of Salt is so amazing I just want to eat it all the time.
It`s easy and it`s so delicious that I have had it 7 days in a row ( yes I know crazy).
Give it a try and if you want to watch how Alton does it watch Good Eats his delicious episode called The Ballad of Salty and Sweet.
Grapefruit Brûlée
Ingredients
2 red or pink grapefruits, chilled
2 tablespoons coarse sugar
3/4 teaspoon coarse sea salt
Special Equipment: Blowtorch
Halve each grapefruit crosswise, and cut a thin slice off the bottom of each half to stabilize the pieces. Remove all seeds from the grapefruit, and loosen the segments with a paring knife.
Sprinkle each half evenly with the sugar. Using a blowtorch, melt the sugar to form a golden brown and crispy surface. Sprinkle the hot sugar with the salt, and serve immediately.


At first I will have to confess that I worked a little around this months recipe. We are all sick, the kids have a sore throat and hubby is on the couch with lumbago.
I myself have huge problems with a liver inflammation what means fatty food is bad. I feel so horrible that even thinking about bacon is making me sick.

I used this month challenge to make a almost fat free version of Brunswick Stew. I used no Bacon, and only chicken breast and lean rabbit meat.
It was delicious. We will make it again, healthy and full of flavour this is a Winner.
I used vegetable stock as the Base, grilled the Chicken Breast and put it aside, thee rabbit I browned in a little rapeseed oil ( this is a beautiful oil for people with liver problems ).
As you will see if you take a look at the Original recipes you can see that the sky is the limit when it comes to the choice of meat and vegetables.
Please give it a try and maybe even go and take a look at the delicious versions of the amazing Daring Cooks.


I love Yeast Dough and I love to Bake so it's no big surprise that I love to bake this little Bunny's for all the Kids in the Family.
They are delicious alone or cut open and spread with homemade strawberry jam.
As you can see on the Pictures its pretty easy and I promise you everybody will love them. I will even send them to YeastSpotting, they are just to cute that I just need to share.
You don't have to make them into Bunny's you can do what ever you want.
Even a little Owl is possible

3 cup flour
1/2 cup sugar
1/2 tsp salt
2 1/4 tsp. instant yeast
1/2 cup softened butter
1/2 cup + 2 T lukewarm milk
1/2 cup yogurt cheese or quark
1 egg, separated
raisins and coarse sugar for decoration
Mix the flour, sugar, salt and instant yeast in a bowl.
If you use a mixer please use the dough hook if not a large spoon is fine.
Mix the milk, butter and Cheese/Quark into the flour.
Knead 1-2 minutes, form into a ball, cover and let rise for one hour.
The dough will not double and you should not panic. It’s very rich and so it will only rise a little.
You can even make the dough the night before you want to bake the bunny’s and stick it into the refrigerator until you are ready.
But don’t forget to let it come to room temperature before you start shaping.
You can shape your Bunny’s how ever you want. You can let your children do it or make them yourself.
I like to cut the dough into 6 pieces. Each piece now is divided into two parts 1/3 of the Ball for the Head and 2/3 of the dough for the body.
Roll the larger piece into a rope about a foot long coil it around your hand and lay it onto a baking sheet that has some non-stick foil on it. As you can see on my unbaked bunny the ends of the rope are sticking out. One end will be the feet and on the tail ( as you can see my tail became Easter egg big and I will tell you that this is the way I wanted it).
Now take the smaller Ball and form it into a egg shape. With shears snip into the pointy end and cut halfway down the middle to form ears.
Now lay the Head onto the body, make sure you like how it’s placed. Use the egg white as glue to make sure the head stays with the body.

Preheat oven to 350°F.
Make e egg wash out of the egg yolk and the 2 T Milk and brush the Bunnies add a raisin for the eye and decorate with the coarse sugar if desired.
Let rise in a warm place.
Bake at 350°F for 25 - 30 minutes, or until bunnies are golden brown and firm to the touch.
Let them cool on a rack and Enjoy.